May 26, 2016
Birthday Table Name Tag
Hello Everyone,
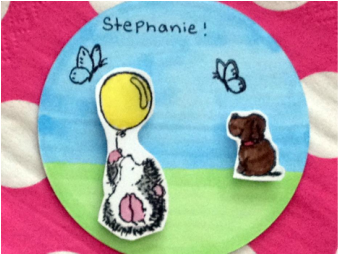
Today I made some cute birthday name tags that will look cute on your table.
To make these name tags I cut a circle out of some white cardstock, using my big shot machine and the spellbinders circles dies.
Once the circle was cut I then grabbed my EK Success markers in the colour light blue and light green and coloured in the circle. I then added the person’s name using the fine point black sharpie pen.
After the circle was coloured in and the name was added I then stamped two butterflies from the penny black critter party stamp set using the versafine onyx black ink pad.
Following the butterflies being stamped I grabbed some white cardstock and the dog stamp from the same set and stamped and bunch to go along with the amount of tags I was making. At the same time I stamped the hedgehog with the balloon on the same piece of white cardstock.
After everything was stamped I coloured it in, once all the images were coloured in I used my EK Success scissors and cut out the images. Now I didn’t show that part on camera since I like to hold it close to my face. The best tip I learned for cutting was from Amy Prairie paper and ink she says to move the image and not the scissors also to cut from the base of the scissors and not the tip. I will link her channel down below.
I decided once the images were cut to pop them up using some foam tape and it gave the tag some nice dimension.
The last thing I added to the name tag was some glossy accents to the balloon. This was the first time I have used glossy accents so I was experimenting with it.
Supplies
|
|
|
|
|
March 27, 2016
Easter Treat Bags
Hello Everyone,
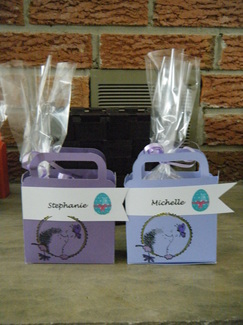
Happy Easter, I made some Easter themed name tag treat bags to decorate our table with.
Before I started making the treat bags I went onto my computer and made some name tags to go on the treat bag and printed them out on some white cardstock.
Once the name tags were printed I used my fiskars paper trimmer to cut them down to the size I wanted. Following that I used my EK Success scissors to cut a flag in one of the ends. I found the best way to cut a flag is to make a cut down the middle and then cut from both corners toward the middle slit.
Next I used my Cricut Machine and the Plantain Schoolbook cartridge to cut out the treat bags at 6” and scored the fold line using the Martha Stewart score board.
After the bag was scored I used my ATG Tape runner and attached the name tag to the top of the bag. Following that I grabbed My Penny Black Stamp and Versafine onyx black ink and stamped the image on the front of the bag.
I then decide to colour the image in using my EK Success markers. The colours used will be listed in the video.
The last thing I did to the treat bag was to tape the fold lines using my ATG tape runner.
Supplies
|
|
|
|
|
