May 07, 2016
Mother's Day Card Turtorial
Hello Everyone,
Today we have a special guest who is also a card maker and will be showing us how to make a Mother’s Day card.
For my Mother’s Day card I started off with a 110 pound white cardstock and scored it using the Martha Stewarts score board.
Next I decided for the front of the card to use two yellow pieces of cardstock. I used one pattered piece which would cover the whole background of the card and a plain one that would just cover the side. I cut both of them down using the Fiskars paper cutter.
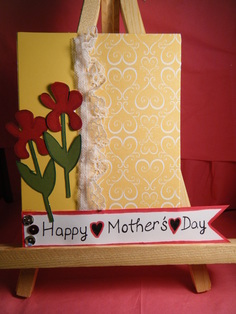
Once both pieces of paper were cut down I then attached them using the ATG Tape runner and adhered the patter paper to the card front and then added the plain yellow one.
I still thought the card could use a little something between both of the yellow papers so I add a piece of lace and attached it to the card with some Elmer’s clear glue and also used the acrylic stamp block to hold it in place while it dried.
Once the lace was fully stuck to the front of the card I then adhered 2 flours I had cut out for something else and ended up not using.
The last thing I decide to add to the front of the card was a little banner. I cut the banner out of some white cardstock and added the word Happy Mother’s Day using a black sharpie pen. The last thing I added was some sequence at the one corner and a red line around the banner.
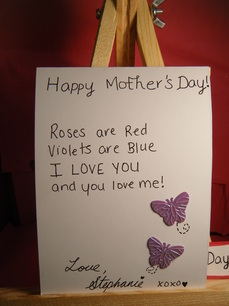
For the inside of the card I used a black jell pen and wrote a nice message and also added two little sequence butterflies. I then thought the card looked complete.
I still thought the card could use a little something between both of the yellow papers so I add a piece of lace and attached it to the card with some Elmer’s clear glue and also used the acrylic stamp block to hold it in place while it dried.
Once the lace was fully stuck to the front of the card I then adhered 2 flours I had cut out for something else and ended up not using.
The last thing I decide to add to the front of the card was a little banner. I cut the banner out of some white cardstock and added the word Happy Mother’s Day using a black sharpie pen. The last thing I added was some sequence at the one corner and a red line around the banner.
For the inside of the card I used a black jell pen and wrote a nice message and also added two little sequence butterflies. I then thought the card looked complete.
I hope you enjoyed having our special guest show you how to make her cute Mother's Day Card.
Supplies
|
|
|
|
|
|
|
|
|
|
|
|
|
|
|
May 4, 2016
50 Birthday Side Step Card
Hello Everyone,
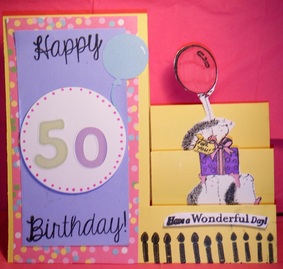
First off for this card I cut down some patterned paper and used my ATG Tape runner to adhere it to the front. You might see a little white spot on the front of the card I was experimenting before and changed my mind on what I wanted to go on the front. While pulling off the paper it kind of left a little tear but that was ok since I was going to be putting another piece of paper right over it. So after the patterned paper was attached I then cut down some light purple cardstock and adhered it over the pattern paper.
After the paper was adhered I then grabbed my happy birthday stamp. I only wanted to stamp the word happy on the top of the light purple paper so I used some scotch tape and covered up the word birthday. I then inked up the word Happy with some Versafine Onyx black ink and then pulled off the scotch tape. Next using the same stamp I stamped the word birthday at the bottom of the card.
Since this was going to be a special 50th birthday card I wanted the 50 to stand out so I used the spellbinders circle die and ran it through my big shot machine. Once the circle was cut out I decided to give it some dimension and added some foam tape to the back. For the number 50 I had some cute stickers and stuck them to the middle of the circle.
After the numbers were stuck on the circle I still thought it looked plain. I used my pink sharpie marker to add some dots around the outside. I then thought the circle looked complete. The last thing I added to the front of the card was a little blue balloon. On the blue balloon I used my white jelly roll pen to add some detail.
Know that the front rectangle of the card was done I went and started working on the steps of the card and planning out what I wanted to go on each step. I worked backwards to forward by working on the last step first. For the last step I decided to use my Penny Black clear stamps I used the hedgehog carrying a balloon and present. I also stamped the two hedgehogs carrying a present. When stamping them the first time they didn’t stamp fully and this is where I wish I had the misti because I would have been able to go back over the image. Oh well I worked with what I had and just re- inked the image and stamped a new one. To colour the images in I decided to us my EK Success markers. The colours used will be listed above in the video. After the images were coloured I used my Ek Success and fussy cut them out. Know that both of the images are cut out I used my Zig two way glue pen to attach them to the card. For the last step of the card I decided to add a border of candles along the bottom and I also added the saying have a wonderful day which I popped up using some foam tape.
Supplies
|
|
|
|
|
|
|
|
|
|
|
|
|
|
|
April 13, 2016
Happy Birthday Shaker Card
Hello Everyone,
Today I made a special shaker card for a 50th birthday.
Today I made a special shaker card for a 50th birthday.
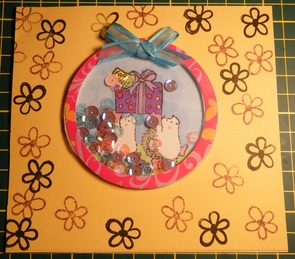
I started off with an image I had all ready stamped for another project and ran it through my big shot machine using the spellbinder circle die.
I then used my EK success markers to colour it in. I decided to colour in the birthday gift with some bright cheery colours to make it stand out.
After the image was coloured in I set it aside and grabbed my card base. For the front of the card I thought I would use some plain yellow cardstock and add my own design to it. I used my ATG Tape runner to adhere the cardstock the base.
Next I grabbed my ATG tape runner and adhere the circle to the front. After the circle was adhered I then grabbed some clear acetate and used my big shot machine to cut a circle with the spellbinders die.
Also when cutting out the acetate I grabbed a piece of patterned paper I had and cut the outside edge of the circle to go around the shaker card. Now I got my foam tape and lined it to the acetate and found that it was too wide so took my EK Success scissors and cut a thin strip off.
Once you take off the backing of the tape it is easier to move the tape around the circle.
After the circle was ready I grabbed some sequence I thought would match the colours I used on the image.
The last two things I added to the front of the card was blue piece of ribbon I used some liquid glue and my acrylic block the push it down until the glue is dry. I also took one of my flower stamps and some black versafine onyx ink and the tim holtz preserves ink to add a nice design to the front.
For the inside of the card I used two of my stamps and some black versafine onyx ink. Once everything was stamped I thought the card looked complete.
Supplies
|
|
|
|
|
|
|
|
|
|
|
|
|
|
|
|
|
|
|
|
March 16, 2016
Just Because Card
Hello Everyone,
I found this old video of this cute just because card I made a while ago.
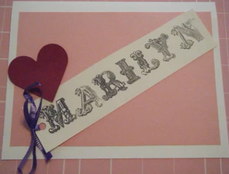
First you are going to grab the card base and fold it down the middle. Once the card base is folded you can set it off to the side and cut one of the pieces of cardstock for the background. When cutting the cardstock you are going to want to leave some white space on the top and bottom.
After the cardstock is cut take the tape runner and adhere it to the card base. For the next step I have all ready cut out a heart from my Big Shot machine using the spellbinders die, you can use any shape you want on the front of your card. I decided to adhere my heart to the card using some foam tape to give some added dimension.
Next take the second colour of cardstock you chose and cut it into a wide strip to allow room for your letter stamps to fit on. Now that the cardstock is cut you will want to take out the letter stamps you are going to use to spell the person’s name you are giving the card to like I did or you can spell out a sentiment. After deciding what to put on the front of the card take the whole punch and punch a hole in the cardstock to put the ribbon through.
Once the ribbon is through the whole you can the tie it into a bow. Following that you will want to take the tape runner and adhere it on an angle to the front of the card.
Now your card is complete and is ready to be mailed off or stored with your other cards to be given when you need it.
I found this old video of this cute just because card I made a while ago.
First you are going to grab the card base and fold it down the middle. Once the card base is folded you can set it off to the side and cut one of the pieces of cardstock for the background. When cutting the cardstock you are going to want to leave some white space on the top and bottom.
After the cardstock is cut take the tape runner and adhere it to the card base. For the next step I have all ready cut out a heart from my Big Shot machine using the spellbinders die, you can use any shape you want on the front of your card. I decided to adhere my heart to the card using some foam tape to give some added dimension.
Next take the second colour of cardstock you chose and cut it into a wide strip to allow room for your letter stamps to fit on. Now that the cardstock is cut you will want to take out the letter stamps you are going to use to spell the person’s name you are giving the card to like I did or you can spell out a sentiment. After deciding what to put on the front of the card take the whole punch and punch a hole in the cardstock to put the ribbon through.
Once the ribbon is through the whole you can the tie it into a bow. Following that you will want to take the tape runner and adhere it on an angle to the front of the card.
Now your card is complete and is ready to be mailed off or stored with your other cards to be given when you need it.
Supplies
|
|
|
|
|
March 5, 2016
Flower Embossed Thank You Card
Hello Everyone,
I got this cut thank you card in the mail from a family member. The thank you card they sent us looked really cute and I thought that I could make my own version of a thank you card.
I got this cut thank you card in the mail from a family member. The thank you card they sent us looked really cute and I thought that I could make my own version of a thank you card.
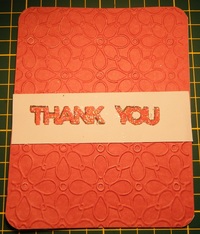
First for the card I grabbed my big Shot machine and my flower embossing folder. I then used a red piece of cardstock and embossed it using the flower folder.
Once the card front was embossed I then grabbed my corner rounder and rounded both the card base and the flower embossed paper. I then adhered the flower embossed paper to the card base using my ATG Tape runner. After the background was attached to the front of the card I then grabbed a piece of white paper that I had cut off of the card when I was trimming it down to the size I wanted it. I used that white piece of paper to go across the middle of the middle of the card.
Once the white piece of paper was attached to the front of the card I grabbed my Martha Stewarts Thank you punch and some bright red and black cardstock. I used both pieces of the cardstock with the punch. My thought was to use the black paper as a shadow behind the red paper. I used my stocker maker that I had received for Christmas to run the Thank- You letters though it. After the letters were run thought I attached them to the front of the card. The last thing I added to the card to tie it all together was some glitter on the Thank you letters and then I thought the card looked complete.
Supplies
|
|
|
|
|
February 19, 2016
Tractor Themed Birthday card
Hello Everyone,
Today I made this tractor themed birthday card.
Today I made this tractor themed birthday card.
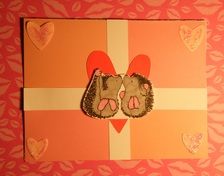
I started the card off by using the Hedgehog kisses stamp from Penny Black and inked it up with some VersaFine onyx black ink and stamped it on some white cardstock. I then coloured it in using my EK success makers in the colours light pink, grey and red.
When the image was coloured I used my EK success scissors to cut it out, I also cut the heart balloons off the hedgehog image since I just wanted the hedgehogs kissing.
Following that, I grabbed some recollections cardstock in the colours pink, peach and white. I cut down the pink and peach cardstock using my paper trimmer into four little square and also cut down the white into two strips. Once the paper was cut down I grabbed my ATG tape runner and adhered them to the front of the card.
After all the paper was attached I flipped the card over and cut off the excess that hung over the edge. When all the paper was cut off I grabbed a heart that I had cut out for another project but didn’t end up using so ran it through my sticker maker and stuck it to the middle of the card. Next I grabbed the hedgehog image and decided to pop it up using some foam tape and stuck the hedgehogs in the middle of the heart. I still thought the card could use something to tie it all together so looked through some cut out shapes I had and found these great hearts that were given to me by a friend and used my Zig two way glue pen to attach them to the corners of the card. The last thing I added to the front of the card was some purple glitter. For the hearts I still wanted to see the pink paper so I added a little bit of the glitter. To finish the card off completely I add the heart balloons on the inside and thought it looked complete.
*Affiliate links used whenever possible. It doesn't affect your purchases, but it allows me to make a little money when you purchase from the links provide Thanks!
Supplies
|
|
|
|
|
|
February 14, 2016
Valentine's Hedgehog Kisses card Series Part 4
Hello Everyone,
Today I made this adorable hedgehog kisses card and it will be the last card for my Valentine’s Day series for this year.
Today I made this adorable hedgehog kisses card and it will be the last card for my Valentine’s Day series for this year.
I started the card off by using the Hedgehog kisses stamp from Penny Black and inked it up with some VersaFine onyx black ink and stamped it on some white cardstock. I then coloured it in using my EK success makers in the colours light pink, grey and red.
When the image was coloured I used my EK success scissors to cut it out, I also cut the heart balloons off the hedgehog image since I just wanted the hedgehogs kissing.
Following that, I grabbed some recollections cardstock in the colours pink, peach and white. I cut down the pink and peach cardstock using my paper trimmer into four little square and also cut down the white into two strips. Once the paper was cut down I grabbed my ATG tape runner and adhered them to the front of the card.
After all the paper was attached I flipped the card over and cut off the excess that hung over the edge. When all the paper was cut off I grabbed a heart that I had cut out for another project but didn’t end up using so ran it through my sticker maker and stuck it to the middle of the card. Next I grabbed the hedgehog image and decided to pop it up using some foam tape and stuck the hedgehogs in the middle of the heart. I still thought the card could use something to tie it all together so looked through some cut out shapes I had and found these great hearts that were given to me by a friend and used my Zig two way glue pen to attach them to the corners of the card. The last thing I added to the front of the card was some purple glitter. For the hearts I still wanted to see the pink paper so I added a little bit of the glitter. To finish the card off completely I add the heart balloons on the inside and thought it looked complete.
When the image was coloured I used my EK success scissors to cut it out, I also cut the heart balloons off the hedgehog image since I just wanted the hedgehogs kissing.
Following that, I grabbed some recollections cardstock in the colours pink, peach and white. I cut down the pink and peach cardstock using my paper trimmer into four little square and also cut down the white into two strips. Once the paper was cut down I grabbed my ATG tape runner and adhered them to the front of the card.
After all the paper was attached I flipped the card over and cut off the excess that hung over the edge. When all the paper was cut off I grabbed a heart that I had cut out for another project but didn’t end up using so ran it through my sticker maker and stuck it to the middle of the card. Next I grabbed the hedgehog image and decided to pop it up using some foam tape and stuck the hedgehogs in the middle of the heart. I still thought the card could use something to tie it all together so looked through some cut out shapes I had and found these great hearts that were given to me by a friend and used my Zig two way glue pen to attach them to the corners of the card. The last thing I added to the front of the card was some purple glitter. For the hearts I still wanted to see the pink paper so I added a little bit of the glitter. To finish the card off completely I add the heart balloons on the inside and thought it looked complete.
*Affiliate links used whenever possible. It doesn't affect your purchases, but it allows me to make a little money when you purchase from the links provide Thanks!
Supplies
|
|
|
|
|
|
Happy Birthday Dog Card
Hello Everyone,
I made this card form my mom to give to her friend for her birthday. I know that my mom’s friend has a dog so I went looking on Pintrest for a dog themed card and when I came across the one I thought looked good I started to make the card.
I made this card form my mom to give to her friend for her birthday. I know that my mom’s friend has a dog so I went looking on Pintrest for a dog themed card and when I came across the one I thought looked good I started to make the card.
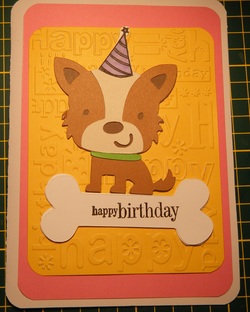
First off I got my card base and my corner rounder; I used the corner rounder to round the corners of the card. Once the corners were rounded I the grabbed a piece of pink cardstock for the background and used my paper trimmer to cut down the paper and then used the corner rounder to round the corners. After the paper was cut down I used my ATG Tape runner and adhered it to the card. I then thought the back ground of the card still could use something so I got out my Big Shot machine and my happy birthday embossing folder and some yellow cardstock. Once the yellow card stock was embossed I again grabbed my corner rounder and round the corners of the paper to tie it all together. Know that the background of the card was complete I then started working on the image that I wanted to stick on the front I grabbed my Create a Critter cartridge and cut out the dog at 3” and used my zig two way glue pen to attach all the parts of the dog together. I then used the same cartridge again and cut out the dog bone on a piece of white cardstock at 2 3/4” I cut out three of the bones so to add some dimension to the card instead of using foam tape since I knew that the card was going to be mailed and again used the zig two way glue pen to attach the pieces together.I then decided to use my birthday stamp set and my black Versa Fine ink to stamp the party hat and coloured it in using the EK Sucess makers in the colours yellow, light purple. Once the party hat was coloured and stuck down on the card the last thing I did was use the happy birthday saying and stamped it on the dog done and then thought the card looked complete.
January 27, 2016
Chipmunk Love Valentine's Day card series Part 3
Hello, Everyone
I have the third card to my Valentine’s Day Card series. I made this card using the Create a Critter Cartridge.
I have the third card to my Valentine’s Day Card series. I made this card using the Create a Critter Cartridge.
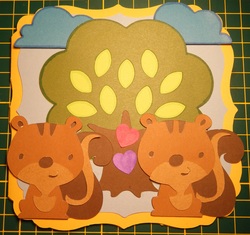
For this card I decided to use my cricut machine and the Create a Critter cartridge to cut out a few of the images for the front of the card. First off I used my heart shaped punch and some white cardstock. I cut out for hearts and used my EK Success markers in the colours red and dark purple. I coloured in two hearts in red and the other two in the dark purple. Next I used my Create a Critter cartridge and cut out the tree at 4 ½” I used some brown, light green and dark green card stock. Once the tree was cut out I used my Zig Two way glue pen to attach the pieces together. After the tree was put together I then grabbed a light brown piece of card stock and dark brown to cut out the two chipmunks at 2 ½”. I again used my Zig Two way glue pen to attach all the chipmunk pieces together.
I then had some clouds that were from another project that didn’t work it so I saved them to use on another project. I thought the clouds would work well for this project so I popped them up using some foam tape. The card base was cut out of the Creative Cards cartridge and again it was going to be used for another project but didn’t end up working either so I saved it for another card. I thought the card base would work for this card and it was cut out of some yellow card stock and the background was some light blue card stock. I added the clouds to the top of the card and then used my ATG tape runner to attach the tree and chipmunks to the card. Once the images were added to the front of the card the last thing I did was add the two hearts to the tree base and the inside right corner of the card.
Don't forget to use the #creativecards16valentinecard and your card could be featured in my next video.
January 20, 2016
Love Bird Valentine's Day Card Series Part 2
Hello Everyone,
I have the second card to my Valentine's Card Series. I made this card using my Cricut machine and my Create A critter cartridge.
I have the second card to my Valentine's Card Series. I made this card using my Cricut machine and my Create A critter cartridge.
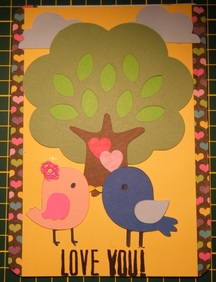
I decided to go on Pintrest and look for some card ideas and I came across this one whit two birds that caught my eye.
I started by cutting out the images that I wanted on the front of my card from the Create A critter Cartridge. I first grabbed a piece of black , light blue , dark blue , and yellow cardstock for the piece of the boy bird. The bird was cut out at 2". I then decided to cut out the girl bird with black , light pink and hot pink cardstock again at 2". I then used my Zig Two Way glue pen to attach the pieces together.
After cutting out the two birds I then grabbed some brown , light green and dark green cardstock for the different parts of the tree which was cut out at 4 1/4". I attached the pieces together using my Zig Two way glue pen.
Once the tree was put together I then grabbed my heart punch and a white piece of cardstock and punched out two hearts. Once the two hearts were punched out I thought they could use some colour before I put them one the trunk of the tree. I used my red and light pink EK Success markers to colour both of the hearts. I then used my Zig Two Way glue pen to attach the hearts to the tree.
After the two hearts were attached to the tree I then thought the card could use two clouds on the front. I cut out two hearts from the same cartridge at 1 1/2" from some light blue cardstock.
Now that I have all the images cut out that I want to use for the front of the card I set them aside for a second and grab a piece of yellow cardstock to be the background for the card. I used my paper cutter to cut some piece off both sides of the yellow paper. I then set the yellow paper on the front of the card base and found out I was not fond of the white space. I looked into my scrap paper bin and found a nice piece of patterned paper with some hearts on the front. I cut it down and attached it to both sides of the card using my ATG Tape runner.
Finally the background was attached to the and I decided to use my corner rounder to make the corners of the card look nice. Now that the corners were done I then attached the images to the front of the card and added Love You! to the bottom with one of my stamps.
Know that the card has the images on the front and the stamped saying I thought the card looke cute and was complete.
Don't forget to use the #creativecards16valentinescards and your card could be featured in my next video
January 16, 2016
Valentine's Day Card Series Part 1
Hello Everyone,
I have decided to start a Valentine's Card Series leading up to February 14 2016. Each week I will make a new video featuring a tutorial on the card made. This week I had some extra time and made a bunch of Valentines cards. Below will be a list of the products I used on each card.
I have decided to start a Valentine's Card Series leading up to February 14 2016. Each week I will make a new video featuring a tutorial on the card made. This week I had some extra time and made a bunch of Valentines cards. Below will be a list of the products I used on each card.
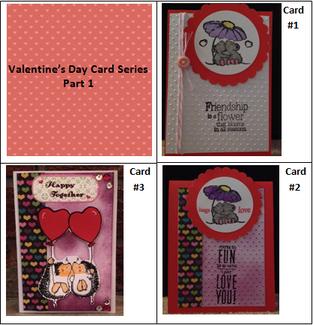
Card #1:
- Penny Black mouse with flower stamp
- Penny Black Friendship is a flower that blooms in all seasons stamp
- Penny Black heart stamp
- Home Sence pink and silver String
- Pink button
- Big Shot Machine
- Swiss Dots embossing folder
- EK Sucess markers
- Scalloped circle
- Circle die
- Red Card stock (card base)
- Black Ink
Card #2:
- Penny Black mouse with flower stamp
- Penny Black Your so fun to be with I just Love You stamp
- Penny Black love and hugs stamp
- Black heart patterned paper
- Big Shot Machine
- Swiss Dots embossing folder
- Time Holtz Distressed ink
- Sponge dabber
- Purple glitter glue
- EK Sucess markers
- Scalloped circle
- Cricle Die
- Red Card stock (card base)
- Black Ink
- Red Ink
Card #3:
- Penny Black Hedgehogs kissing with heart balloons stamp
- Red card stock (heart balloons)
- Jelly roll pens
- Black heart patterned paper
- Big Shot Machine
- Swiss Dots embossing folder
- Ek Markers
- EK Sucess markers
- Crayola markers
- Tim holtz Distressed ink
- Sponge Dobber
- Black Ink
- Happy Together ( Scrapbooking kit)
- Sequence
- White Card stock (card base)
- Penny Black mouse with flower stamp
- Penny Black Friendship is a flower that blooms in all seasons stamp
- Penny Black heart stamp
- Home Sence pink and silver String
- Pink button
- Big Shot Machine
- Swiss Dots embossing folder
- EK Sucess markers
- Scalloped circle
- Circle die
- Red Card stock (card base)
- Black Ink
Card #2:
- Penny Black mouse with flower stamp
- Penny Black Your so fun to be with I just Love You stamp
- Penny Black love and hugs stamp
- Black heart patterned paper
- Big Shot Machine
- Swiss Dots embossing folder
- Time Holtz Distressed ink
- Sponge dabber
- Purple glitter glue
- EK Sucess markers
- Scalloped circle
- Cricle Die
- Red Card stock (card base)
- Black Ink
- Red Ink
Card #3:
- Penny Black Hedgehogs kissing with heart balloons stamp
- Red card stock (heart balloons)
- Jelly roll pens
- Black heart patterned paper
- Big Shot Machine
- Swiss Dots embossing folder
- Ek Markers
- EK Sucess markers
- Crayola markers
- Tim holtz Distressed ink
- Sponge Dobber
- Black Ink
- Happy Together ( Scrapbooking kit)
- Sequence
- White Card stock (card base)
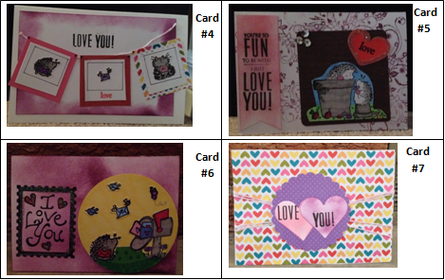
Card # 4:
Penny Black Hedgehog with letter stamp
- Penny Black love you! stamp
- Penny Black birds with letter stamp
- penny Black Cat stamp (added the envelope)
- Penny Black Love stamp
- Black Ink
- Red Ink
- EK Sucess markers
- Martha Stewart's Score board
- Three different patterned papers
- Home Sence Pink and silver string
- Tim Holtz Distressed ink
- Sponge Dobber
- Fine tip black sharpie
- White Card stock (card base)
Card # 5:
- Penny Black birds stamp
- Penny Black butterfly stamp
- Penny Black I Love You Stamp
- Glitter
- Flower Stamp
- Black Ink
- Red Ink
- Sponge Dobber
- EK Sucess markers
- Sequence
- Cricut Machine
- Cricut heart
-Cricut Square backgroung
- Tim Holtz Distressed ink
- White Card stock (card base)
Card # 6:
- Penny Black Hedgehogs on flower pots
- Penny Black Your so fun to be with I just love you!
- Penny Black Love Stamp
- Penny Black Hedgehog with letter stamp
- High Hopes mailbox stamp
- Black Ink
- Sponge Dobber
- EK Sucess markers
- Tim Holtz Distressed ink
- Big Shot Machine
- Circle Die
- White Card stock (card base)
Card # 7:
- Penny Black Love you stamp
- Black Ink
- Red Ink
- Sponge Dobber
- Home Sence pink and silver string
Time Holtz Distressed ink
- Big Shot Machine
- Heart dies
- Heart patterned paper
- White Card stock (card base)
Don't forget to use the #creativecards16valentinescards and your card could be featured in my next video
December 1, 2015
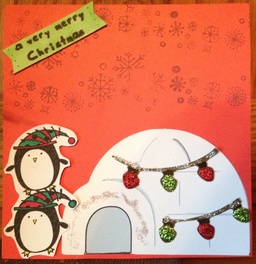
A Very Merry Christmas Card
Hello Everyone,
Since today is December 1st it is starting to feel more like Christmas because it it less than a moth away. Today I decided to start working on making some Christmas cards. I looked on Pintrest and found a few cards ideas that I loved which helped me come up with the idea for my A Very Merry Christmas Penguin Card.
Know that I came up with an idea for what I wanted my card to look like I got started making the card. I first grabbed a piece of white card stock for the base and folded it in half. Once that card base was folded in half I them cut off excess until it was down to the size I wanted it.
After the card was cut down to the size I wanted it I them grabbed a piece of red card stock for the front of the card. I measured the red card stock and cut it down to fit the front of the card and adhered it using my ATG Gun. I then used my Creative Critter Cricut Cartridge to cut out the igloo at 2 3/4" on white and light blue card stock and I also cut out some Christmas lights at 1" on brown card stock.
Once the pieces were cut out I used my ATG Gun to adhere the igloo to the front of the card. After I glued the igloo I then grabbed my Christmas lights and stuck them to the igloo using my Zig Two Way glue pen. I then used some glitter glue to fill in the lights to add more color to the card.
While the front of the card was drying I then stamped two penguins onto a piece of white card stock and used my yellow, red and green EK Success markers to color them in. I used the yellow for their beak and feet and the red and green for their hat. Once coloring was done I grabbed my scissors and cut them out.
After cutting the penguins out I still had to stamp and cut out my A Very Merry Christmas Saying. I cut it out with a flag shape on each side and the colored it using my pastel green Ek Success marker. I put the tow images aside that I had cut out so that I could take my snowflake stamp and stamp it for the background of the card.
since the snowflake images was stamped on the card I grabbed the two images I had set aside and added some 3-D foam tape to make them stand up on the card. The very last thing I did to the card to tie it all together was to cut down some red and Christmas tree card stock to add on the inside of my card.
September 19, 2015
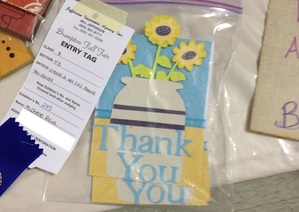
A set of 4 Thank You cards - Local Fair Entry
Hi Everyone,
I recently sat down last week to make some cards for a local fair that was coming up on the weekend. I looked online and saw that they had a category for a set of four thank you cards. I then went on to Pintrest and searched in handmade cricut thank you cards and looked around till I found a few cards that caught my eye. Once I found the few cards that caught my eye I then looked at them until I got some ideas for my card.
Know that I had an idea for my set of 4 thank you cards I went to my scrapbook area and found the items I needed. After collecting the items I needed to make the card I sat down and started to create the card. I first grabbed my 110 pound white cardstock and laid it on the Martha Stewart score board to score a line down the middle. Once the line was scored down the middle I then folded the card and cut it down the middle so that I would have two cards. After I had two cards I then repeated the above steps again so that when I was done I would have four cards.
When the four card bases were completed I then grabbed a piece of light blue cardstock and embossed it using my Divine Swirls embossing folder and then stuck it to the front of the cards. I then thought the bottom of the cards could use something because it was a
bit plain. I went through my patterned cardstock and found one that was yellow with light polka - dots on it. I cut it down and added it to the bottom of the card . After adding the paper to the bottom I went to my ribbon bin and found a nice blue see through ribbon and added it to the top of the yellow paper.
Once the ribbon was added I sat down at my Cricut machine and used my Country Life and Plantain Schoolbook cartridges for the front of the card. I grabbed a piece of white cardstock and cut out the kitchen utensils pot to be my flower pot. After cutting out the flower pot
then grabbed some yellow, green and black cardstock and cut out the sunflowers. Since the sunflowers came with some grass at the bottom I decided to cut it off and just use the flowers because I was adding them to them to the flower pot. After all the flowers and their pieces were cut out and stuck together I grabbed my white Jelly Roll pen and added some dots to the middle of the flower head, the stem and leaves of the flowers. I then thought since it was a thank you card I would use the same blue paper that I used for the back ground and cut out the words thank you and stick it to the front of the flower pot to finish it off.
Once the set of four thank you cards was complete I then took them to my local fair and entered them. The next day after they were done being judged I went back and looked to see if I had won anything and I got a second place ribbon which was great. I also looked at the other cards that were entered into the category and thought that they all looked great too.
August 20, 2015
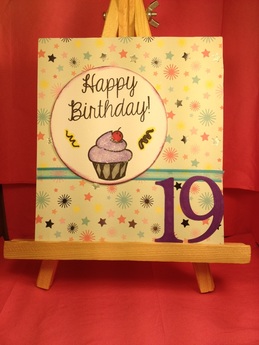
Cupcake Happy Birthday Card
Hello Everyone,
This week I sat down in my craft room to make my cousin a birthday card. I got inspired for the card idea by another project I was working on.
I grabbed a piece of white cardstock and used my Martha Stewart score board to score a line down the middle. Once the line was scored I then grabbed my paper trimmer and cut the card down to the size I wanted.
After the card was cut down to the size I wanted I grabbed the stamp set that I had been using for another project and stamped it onto a white piece of cardstock. I then got one of my circle dies and my Big Shot machine to cut out the image that I just stamped.
Once I cut out the image I then looked threw my birthday paper packs to see which one would look good on the front of the card and found one that had start. Next I cut the paper down to the size of the card and attached it using the ATG Gun. After it was taped down I thought the card could use a piece of ribbon to add a little touch, I went thru my ribbon bin and found and nice blue colour that would match the paper on the card.
I then stuck the ribbon onto the front of the card and added the circle with the stamped image to the front. Once they were all added the card still looked like it needed something to tie it all together and finish it off so I decided to add the age to the bottom right corner.
After everything was attached to card I thought it looked great.
August 9, 2015
Baby Card
Hello Everyone,
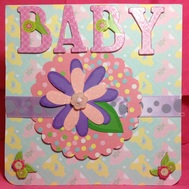
Today I decided to make a baby card, I was inspired when I saw a card on Pintrest.
I grabbed my baby paper pack and looked threw until I found one that caught my eye. Once I found one I cut it down to fit the size of my card. After cutting the paper down I stuck it to the card using my ATG gun. Next I grabbed a patterned scalloped I had cut for another card but it didnt end up working in the end so it was perfect for this card.
I had seen some card making ideas on youtube before and thought that the scallop would look nice with a piece of ribbon threw it. I got my ribbon bin and looked threw it until I found one that matched the card and scallop. After finding a purple polka doted ribbon I then took my hole punch and punched some holes for the ribbon to go and then stick it to the card.
Once the scallop was stuck to the card I then got my container with some cut outs that I made before and looked threw to find one that would work for the card. I found this pretty flower and added a flower button to the middle of it to tie it all together.
After gluing the flower down to the circle scallop I then got my letter stickers and spelled out the word baby and took my corner rounder and rounded the two bottom corners and added two flower stickers to the corner to finish the card off.
July 29, 2015
Flower Thank- You Cards

Hello Everyone,
Today I made two thank- you cards. The cards look similar but are each a little different. I found the ideas for these cards on "Thescrapmaster" youtube channel.
I took a piece of 110 lbs white cardstock to use for the base of my cards. I grab my Martha Stewart Score Board and lined the cardstock up and scored a line down the middle. After scoring a line down the middle I then folded the card over and lined it up again to score a cut line down the middle. Once the cut line was scored I used my paper cutter to cut the card in half so I would end up with two cards.
Now that I have my two card bases ready to go I grab my corner rounder and round the bottom of both cards to add a little something to them. After rounding the corners I go through my collection of paper pads to find one I like for the card. While looking through I found one with flowers and flip through till a design caught my eye to go on the top half of the card. After finding a pattern to go on the card I decided to round one of the papers corners and leave the other one.
Now that I have picked the design theme of flowers for my cards by having the top half of the card have a flower paper I then used my "Thank - You" punch on a light yellow piece of cardstock and coloured it in using my EK Markers to make it a brighter yellow. Once the thank - you was stuck to the card I used the flower that punched out on one of the cards and coloured it in. On the other card I grab my small flower punch and cut three flowers and colored them to give them a more vibrant look on the card.
June 10, 2015
Anniversary Card
Wot Wot her's y first card post!!!
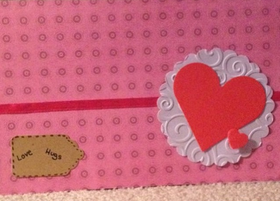
I made this card for my cousins wedding which in in June. I got the idea from a card my friend made. I used sheet of white card stock and my Martha Stewart Score Board to make a crisp score line down the middle of the card stock. After scoring the card I went to my stock of patterned paper and looked through to find one to match the theme of the card. After picking the pattern paper I grabbed my Fiskars paper cutter and trimmed the paper down to fit the card and used my ATG Gun to glue it to the front.
Once the pattern paper was on the card, I went to my ribbon collection to find the perfect one for the front of the card that would match the pattern paper. I found the dark pink ribbon from the Dollar Store. After sticking the ribbon down I went and grabbed my Big Shot machine. I grabbed my heart die and swirls embossing folder to decorate the front of the card. I used one of my Punches and cut out a scalloped circle then embossed it using the swirls embossing folder.
After the heart and the scalloped circle was on the front of the card I thought it could use a little sometime to just finish it off. I looked through my pile of craft supplies and saw my tag punch and some light brown card stock. I punched out the largest tag and use a dark brown Sharpie maker to go around the tag and make some dots then wrote love and hugs to finish it all off and tie it together.
